
DeskMemory Unpacked: Tools You Didn't Know You Needed (Until Right Now)
31 May 2026
We've covered the basics — capture, search, chat, save. But DeskMemory has a second gear. These are the features that feel like they were built for people who've been using the app for months, even if you just installed it yesterday.
# DeskMemory Unpacked: Tools You Didn't Know You Needed (Until Right Now)
We've covered the basics â capture, search, chat, save. But DeskMemory has a second gear. These are the features that feel like they were built for people who've been using the app for months, even if you just installed it yesterday.
No markdown required. No tech background needed. Just a willingness to try something that'll make you say "wait, it can do *that*?"
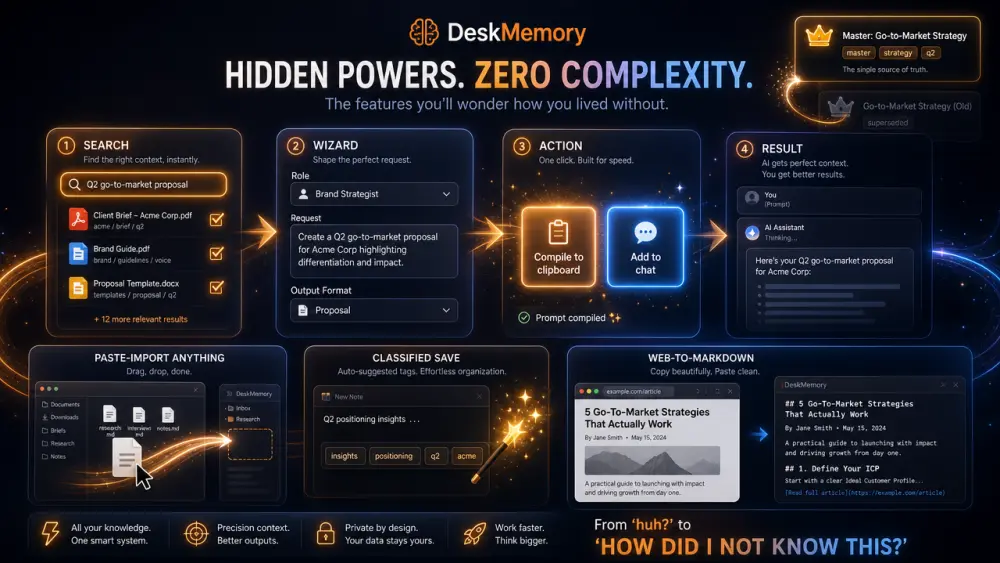
1. The Prompt Compiler: From Search to Ship in Three Clicks
This is DeskMemory's hidden workflow wizard â and once you use it, you'll wonder how you lived without it.
The scenario: You've just searched your vault with `~` and the Top relevant matches area has surfaced exactly the right files. Maybe it's past client briefs, your brand guide, and a proposal template. Now what?
Click the checkbox next to those files. Then click Create prompt.
A short wizard walks you through: - Confirm (or tweak) the category and tags for each selected file - Pick a role from your vault templates ("brand strategist," "research assistant," "personal chef") - Add an optional request ("Draft a proposal outline for a new client in the wellness space") - Choose an output format (email, report, blog post, custom â all defined in your Settings)
Then â boom â two options: - Compile to clipboard â the perfect prompt is copied, ready to paste into any AI tool - Add to chat â it lands directly in your active chat, with those ranked files still attached as vault context
You can even save the compiled prompt itself as a vault note for reuse, tagged as `type: prompt`.
Training exercise: Find three notes about a current project. Select them, hit Create prompt, and compile to clipboard. Paste it into a fresh chat. Notice how the AI responds differently when the prompt has structure, role, and format baked in â that's the difference between "ask me anything" and "here's exactly what I need."
Wow moment: You go from "I have these files" to "I have a ready-to-send prompt" in under 30 seconds. No copy-paste-format-repeat dance. Just your best material, shaped into a request that works.
2. Masters & Crowns: Version Control for People Who Hate Version Control
Some notes are more than notes. Your brand voice guidelines. Your résumé. The SOP that's gone through seven iterations. These are master documents â and DeskMemory treats them differently.
In the Save dialog (or via Edit details⦠on an existing file), set the Type to "Master." Instantly:
- A golden crown icon appears next to the file in the sidebar â it commands attention
- The file is always searchable â that toggle for vault search is locked on
- When you save a new version later with the same category, the previous current master is automatically marked as superseded â its crown turns grey, but it's still findable (and still in your vault, not deleted)
Why this matters: You can have one "current" brand guide, one active résumé version, one definitive onboarding checklist â and a deep archive of everything that came before, all properly labelled and still searchable.
Training move: Find your most important document. If it's already in your vault, use Edit details⦠to make it a master. If it's not, create it now. Next time you update it, watch the versioning happen automatically.
Wow moment: Six months from now, you need to check what your brand voice said in version 2 (before that client meeting you'd rather forget). That note is still in your vault, superseded but intact. You didn't need Git. You didn't need a wiki. You just needed a crown.
3. Paste-Import: The Fastest Way to Populate a Vault
You already know about Add file⦠for one file at a time, and Import Markdown from folder⦠for bulk migration. But there's a middle path that most people miss.
Paste-import works like this: 1. In your file manager, copy one or more `.md` files (Ctrl+C / âC) 2. Click somewhere in the DeskMemory tree area (not inside a text editor field) 3. Press Ctrl+V / âV
Each copied file is imported into the selected folder context (or the vault root if no folder is selected). No dialogs. No taxonomy decisions yet. Just fast file ingestion.
*This is different from pasting rich text from a webpage into a note body* â that's web-to-markdown conversion. Paste-import is for bringing raw Markdown files from your desktop, an export folder, or a colleague's USB drive.
Training tip: Use this when a friend sends you a zip of their notes from another app. Unzip, copy the `.md` files you want, and paste them straight into the folder where they belong. Later, run through them with Edit details⦠to add metadata.
Wow moment: You can move an entire project's worth of notes into your vault in seconds â not hours â because you skipped every intermediate step.
4. Classified Save: The Dialog That Organises You Automatically
When you create a new note from New file, Add fileâ¦, or a PDF drag-and-drop, you meet the Save dialog. It looks simple â title, type, category, tags, placement â but it's doing heavy organisational lifting without you noticing.
- Pick a category, and the file is placed into that folder (created automatically if it doesn't exist)
- Leave the date blank, and today's date is filled in
- Pick a tag, and a suggested tag chip per category appears â you can tap to add, or type your own
- Mark it as a master, and the versioning rules kick in (see #2 above)
But here's the magic: after you've used the Save dialog a few times, the taxonomy you've defined in Settings â Chat Settings starts popping up as suggestions. The AI learns your tagging patterns. It starts proposing categories based on your note content. Every time you save, your vault gets a little more consistent â without you maintaining a spreadsheet or wiki.
Training habit: For your first week, use the Save dialog for every new note (even Quick Capture bypasses it by design â just to keep capture frictionless). After that, your vault structure becomes muscle memory, and the AI suggestions become eerily accurate.
Wow moment: A month in, you save a new note about a client project, and the suggested tags are exactly what you would have typed. You tap three chips and click save. It took five seconds.
5. The Web-to-Markdown Paste (Yes, It Works on Complex Content)
You copy a richly formatted webpage â headings, bullet lists, links, bold text, even a table â and paste it into a DeskMemory note or Quick Capture body.
DeskMemory converts it to clean Markdown automatically. Not a messy HTML dump. Not a garbled plain-text disaster. Properly structured Markdown you can read, edit, and search.
- Headings become `##` or `###`
- Links become `text`
- Tables become readable Markdown tables
- Bold and emphasis survive
Why this is a superpower for non-technical users: You don't need to *learn* Markdown to *benefit* from Markdown. You just paste, and DeskMemory handles the translation. Your vault stays consistently formatted, searchable, and AI-friendly â without you ever typing a bracket